Thursday, April 7, 2011

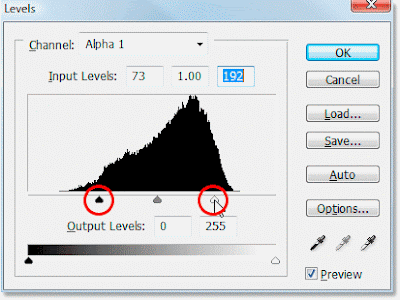
Adobe Photoshop Levels Dialogue Box

Use the Levels dialogue box (Imag>Adjust>Levels) to adjust the tonal balance for colour and grayscale images. You can adjust highlight, shadow and midtone ranges for a selection or an entire image, or you can make changes to individual channels only.


Input Levels

The Input Levels dialogue box (Image>Adjust>Levels) to improve the contrast in a ‘flat’ image.

1. Use the Channel pop-up menu to select a channel. If you do not select an individual channel, you can work on the composite image and affect all channels.

2. To darken an image, drag the sold black slider to the right. Altermatively, enter an appropriate value in the leftmost Input Levels entry box. This maps or clips pixels to black. For example, if you drag the black slider to 15, all pixels with an original value between 0 and 15 become black. The result is a darker image.

3. To lighten an image, drag the hollow, white Input Levels slider to the left. Alternatively, enter an appropriate value in the rightmost Input Levels entry box. The result is to map or clip pixels to white For example, if you drag the white slider to 245, all pixels with an original value between 245 an 255 become white. The result is a lighter image.

The most flexible way of working with Levels, Curves and Color Balance is to set up Adjustment layers (see page 119). Adjustment layers allow you to readjust settings in the respective dialogue boxes until you are satisfied with the result.

Dragging either or both the black or white input levels sliders inwards has the effect of increasing contrast in the image.

Saturday, March 26, 2011

Adobe Photoshop Auto Levels And Color Settings

Auto Levels allows you to adjust brightness and contrast automatically. Auto Levels examines each colour channel independently and changes the darkest pixels to black and the lightest pixels to white, then redistributes the remaining shades of grey between these two points.

Auto Levels works best on images that have a reasonably even distribution of tonal values throughout the image, as it redistributes pixels based on white and black points, with a tendency to increase contrast.


Auto Color removes unwanted colour casts in an image without adjusting the contrast in an image.

1. To apply Auto Levels to an image, choose Image>Adjust>Auto Levels.(Use Edit>Undo if you do not like the result.)

2. To apply Auto Color to an Image, choose Image>Adjust>Auto Color. (Use Edit>Undo if you do not like the result.

Auto Levels adjusts each colour channel in the image individually. As a result, it may remove or introduce colour casts.

Both Auto Levels and Auto Color generally produce good results, but they do not allow the precision of manual adjustments that you can make using the Levels and Curves dialogue boxes

Monday, March 14, 2011

Adobe Photoshop Brightness And Contrast Command

The Brightness/ Contrast command provides the least complicated controls for changing overall brightness and contrast levels in an image. It dose not allow you to make changes to individual colour channels; it makes the same adjustment to every tonal range of the image.


1. To change brightness and contrast for an entire image, or for a selection, choose Image > Adjust > Brightess/Contrast. Drag the Brightness and Contrast sliders to the right or lift, or enter a value in the entry boxes (-100 to +100). OK the dialogue box.

2. If you are making adjustments to a selection, click the preview button to see, on screen, the result of the settings you choose.

3. Choose Image>Adjust>Auto Contrast (Ctrl/Command + Alt + Shift + L)to automatically adjust the contrast for an image or sele ction. Highlightes should appear lighter the shadows darker resulting in an overall improvement in the image. Auto Contrast dose not adjust individual channels in an image. It makes highlightes appear lighter and shadows darker by mapping the lighter and darkest pixels in the image to white and black respectively.

Tuesday, February 22, 2011

Adobe Photoshop Channel and Quick Mask Options

The Channel Options dialogue box and the Quick Mask Options dialogue box allow you to control the colour of a mask and whether the protected or unprotected area of the image is coloured with the overlay.

1. To change channel options, double-click the alpha channel name. Alternatively, with the alpha channel selected, use the Channel Options.

2. In the Channel options dialogue box you can enter a new name for the channel. You can also choose Selected Areas to reverse the way in which the colour will apply, in other words, masked (protected) areas will appear white, while the selection area (unprotected) will appr black.


3. To change the colour used to represent the masked (protected) area and its opacity, click the Colour box and choose anew colour form the Colour Picker.

4. To change the settings for a quick mask, double-click either the Quick Mask Mode icon or the Standard Mode icon, then make the appropriate changes in the dialogue box that appears.

Friday, February 18, 2011

How to Applying Layer Masks in Adobe Photoshop CS5

Use layer masks to hide or revel areas of a layer. A layer mask is extremely useful because you can it to try out effects without actually changing the pixels on the layer. When you have achieved the result you want, you can apply the mask as a permanent change. If you are not satisfied, you can discard the mask without having permanently affected the pixels on the layer.

This example begins with an image with two layers. The Background layer is the original scan: the other layer was created using the Render>Clouds filter.


1. To create a layer mask for the Clouds layer , fist click on the layer to make I active. Choose Layer>Add Layer Mask >Reveal All. Reveal All means that all the pixels in the layer are visible. The Clouds layer now completely obscures the Background layer.

2. In the Layers palette, the layer mask is active, indicated by the Mask icon next to the Eye icon. Click on the layer thumbnail to make the layer active(the Paintbrush icon indicates that you can now work directly on the layer). Click on the layer Mask icon to continue editing the mask.

3. With the layer mask selected make sure that the foreground color is set to black. Choose a painting tool and start painting . Painting with black hides pixels on the Clouds layer, revealing pixels on the Background layer.

4. Pixels on the Clouds layer are not permanently erased when you paint with black. Paint with white to pixels on the Clouds layer- in effect hiding pixels on the Background layer.(if you choose Layer >Add Layer Mask>Hide All, you start with the opposite scenario to the above. Now all the pixels on the clouds layer are hidden.
Paint wih white to reveal on the Clouds layer, paint with black to hide them.)

5. To temporarily switch off the layer mask, choose Layer>Disable Mask, or hold down shift then click on the Layer Mask icon. TO reactivate the mask, choose Layer>Enable Layer Mask, or hold down shift then click again on the Layer Mask icon.

6. To apply the layer mask as a permanent change, choose Layer>Remove Layer Mask>Apply, To discard the layer mask, without affecting pixels on the layer, choose Layer>Remove Layer Mask> Discard.

7. Or drag the Layer Mask icon (not the Layer icon) onto the Wastebasket icon in the bottom of the palette. Click Apply or Discard. Once you apply a layer mask you lose the flexibility of making further changes the effect is fixed. Click Discard only if you want to delete the mask.

DON'T FORGET -

1. You can only have one layer mask per layer.
Related Posts with Thumbnails