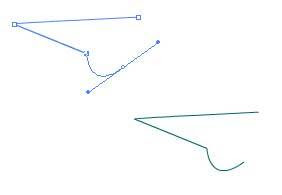
By simply clicking with the pen tool, you can add sharp anchor points on straight lines. The Pen tool can also draw curves. Instead of just clicking to create a point, you can click and drag to create a curve. The direction in which you drag creates what will become a tangent to your curve. The distance you drag determines how gradual or extreme the curve will be. If that makes perfect sense, I’m surprised. You’ll just have to experience it to understand. Therefore, you’ll experient with these pen tool basics in the following task.
How to Use the pen tool
In the task you’ll use the pen tool to draw controlled shapes. Follow these steps;
1. To begin, draw a diamond by using the pen tool, select the pen tool and from the properties pacel , set the stroke thickness high (say 20) and set the Join option to Miter. Then, toward the bottem of the stage, click and let go (this will be the bottom om the diamond). Then, up and to the left, click once for the left corner of the diamond. Click and release for the top and right corners as well. Finally move your cursor near the first point you created,. You should see the cursor change to include a little circle, as in Figure 2.13. Later in this hour you’ll learn how the cursor frequently changes to provide information. For now, know that the little circle on the pen tool indicates that if you click it, you’ll enclose the shape you started. Click to enclose the shape. It should automatically fill with the current fill color. Feel free to repeat this step by first selecting the join option Round; the corners in the diamond will look much different.
2. Next, draw a V shape by using the pen tool. Click once for the top-left point of the V, Click once for the bottom point, and then double-clicking finishes the shape, even if it’s not enclosed; if you click again elsewhere on the stage, you’ll be starting a new shape or line. Therefore, four ways to finish what you’ve started with the pen tool are to click and to enclose the shape (as you did in step1). A fourth way is to simply select another of the drawing tools or press the Esc key.
3. Now try to create a curved line. select the pen tool (to make sure you’re starting a new line) and then on the left side of the screen click once (and let go).
 4. Now you need to lay down an anchor point on the cure you want to create. Therefore, you need to click and drag before you let go. Above and to the right of the first place you clicked. Click and hold the mouse down. While holding down the mouse button, if you move the mouse to the right, you’ll see that your horizontal tangent causes a curve to appear and then level off.
5. Continue to hold down the mouse button while moving the mouse straight above the second point, and you should see that the shape of the curve is totally different because the tangent you’re creating is different.
6. Finally, while still holding down the mouse button, you can increase or decrease the distance you’re dragging (from the point you clicked). The affects the influence on the curve’s arc. Before your hand gets tired, move the mouse to the right. Then double-click down to the right at about the same height as the first point to make an arc. Even though this curve has three points, only the middle one needs a curve to it-that is when you create the first and last points, you don’t click and drag.
You can edit any drawn shape in the same manner in which you drew lines with the pen tool in the preceding task. You just select a shape by using the subselect tool (that’s the white arrow at the top right of the tools panel), and you see the same handles and anchor points as in the preceding task.

No comments:
Post a Comment