The two tools to create fills are the Brush tool and the Paint Bucket tool. You’ll do a little experimenting with these tools in the following task.
Try it yourself
In this task you’ll explore the basic features and some rather advanced features of fills. Here are the steps to follow.
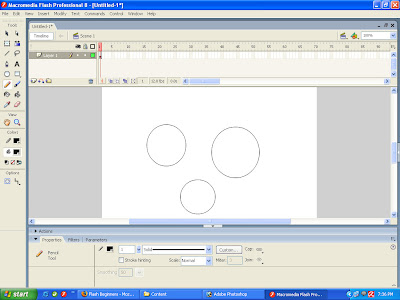
1. In a new file, use the Pencil tool to draw large circles. Be sure to first turn off Object Drawing (the option in the Tools panel when the Pencil is selected). Make at least one totally closed, and another obviously not closed, as shown in this fig.,
2. Select the Paint Bucket tool. Notice that the options section at the bottom of the Tools panel has two buttons: Gap Size and Lock Fill (see this Fig.,).

3. If you click with the Paint Bucket tool in an empty part of the Stage, nothing happens . the Paint Bucket tool fills closed shapes with the selected fill color (the swatch next to the small paint bucket in the Colors section of the Toolbox). It also changes the fill color of any fill already created. Change the Gap Size option to Close Large Gaps. Adjusting the Gap Size option should enable you to fill your circles – even if they are not totally closed.
4. Select the Brush tool and quickly draw a line. Because you’ve used the Brush tool, now it’s really a fill (not a line), despite the fact it might look like a line.
5. Now, choose a new fill color by clicking and holding the color fill color swatch (from the Tools panel), then select the paint Bucket tool and fill the shape you just draw with the Brush tool. Not only can the Pint Bucket tool change the colors of the filled circles you’ve already filled, but it can also change the color of fills created with the Brush tool.
6. Now look at the Brush tool’s options area at the bottom of the Tools panel. In addition to the Brush Mode, there are two seemingly identical black circles but there are actually quite different. The brush Size controls the brush’s up shape. For example, you can have a calligraphy look with the angled tip, as shown in this Fig., Look Fill is covered in step 7. (if you have a pressure –sensitive tablet connected as a pointing device you’ll also see the option to “Use Pressure” meaning the Paint Brush draws thicker when you press harder.)
7. Fig., demonstrates each Brush Mode option. Try one now. Select the paint Inside Brush Mode option to experiment with it. Either use the closed circles you drew earlier or draw a few more circles by using the pencil tool. Make sure you have the Brush tool selected (notice that the Brush Mode option remains where you last left it); then click and paint inside one of the circles. Try painting outside the lines. If you start painting outside the circle, the Paint inside Brush Mode option prevents you from spilling any paint outside the shape! With Paint Inside selected. If you first click outside the shape, nothing happens.
Let me recap just a few important points that are consistent for all the tools. First, certain tools have additional options that appear in the bottom section of the Tools panel. If you can’t seem to find an option that you’ve seen before, you might have to remember for which tool it was designed. This fact shouldn’t be too frustrating because any attribute you need to change after drawing is usually found in the Properties panel (which you’ll learn to leave open all the time).
Another thing to notice is that sometimes the same task can be achieved a number of different ways. For example, you have seen the Zoom command in the View menu, the Zoom tool, and the Zoom setting on the Stage. And you have seen that the fill color swatch can be changed from the Tools panel, the Properties panel, and the Color Panel. The fact that you can do the same task by using different methods means you can find a style that works best for you.

No comments:
Post a Comment