Clearly, the most common use for Flash is to create interactive animations for the web. Sifting through all the different file types involved can be a little confusing. At a minimum, you need to understand three types: source (.fla) files, exported (.swf) files, and or Hypertext Markup Language (HTML-.htm or .htm1) files.
SOURCE (.FLA) FILES
One of the two main file types in Flash is the source Flash movie that you save while working it uses the file extension .fla (often pronounced “fla”). You can open and edit any .fla file, provided that you own Flash. This is your source file. With the .fla file, you can always restore the other file types-but nothing can restore a .fla file (except, maybe, doing all the work over again).
When sharing files with others who need to edit the source file, you share the .fla file. Anyone who has Flash Cs3 (for either Mac or Windows) can open and edit the .fla file you create. However, you can’t put .fla files into a web page for people to view- they’re just files that contain your source content.
EXPORTED (.SWF) FILES
When you’re finished editing a source file and ready to distribute your creation, you simply export a .swf (pronounced “swif”) Flash player file. A .swf file can be viewed by any one who has an Internet browser and the Flash player plug-in. The audience can’t edit the .swf-they can only watch it.
The process for creating a new .swf file is simple. You open a .fla file, select file, Export Movie, and then specify the name and file location for the .swf file in the Export Movie dialog box. Although more details are involved, the important point to understand is that exporting involves creating a new file (the .swf file), but the .fla file remains untouched. It’s similar to using save As or Save a Copy As in some other software programs. Whatever you do, you should always keep a copy of your .fla file. You can always create more .swf files from it-or make edits and then create more .swf files.
HTML FILES THAT HOST THE .swf FILE
If you have any experience creating HTML, the basic process of putting .swf files in web page should be simple. It you have no HTML experience, it won’t hurt to learn a little HTML, but you really don’t have to. Remember that when you “visit” a web page, you’re not really “going” anywhere. Rather, your browser software downloads a text file (with either an .htm or .html file extension). This HTML file contains not only the words you see on the web page, but additional instructions as well, including the font style and size.
In addition, the HTML file contains details about any of the pictures that are supposed to be seen on the web page-details such as the image file’s name and from where it should download so that you can see it. Putting a Flash player ( .swf) file in a web page is almost as easy as putting a picture in a web page. A few other details (in addition to the filename of the .swf) can be included, such as the background color, whether you want the movie to loop, and other interesting settings that are unique to Flash.
To make this process even easier, Flash includes a feature called publish (discussed in Hour 19, “Linking a Movie to the web”, and Hour 24, “Publishing a Creation”), which walks you through the steps of creating both the .swf file and the .html file. Every detail available can be specified in the Publish settings dialog box (see Figure 1.20). you can specify parameters for each file format that you intend to distribute by using the tabs that appear (only the tabs for the file types you specify appear).

Saturday, November 28, 2009
Thursday, November 26, 2009
FLASH DOCUMENT PROPERTIES
You need to specify a few far-reaching settings early in the creation of any movie. Most of these are found in the Document properties dialog box, shown below figure, which you access by selecting Modify, Document or double-clicking the bottom of the timeline (where you see 12 fps). You should access the Document properties dialog box now so that you can experiment with a few of its settings. (Notice that most of the same settings appear in the properties panel if you click the stage or otherwise deselect all objects).
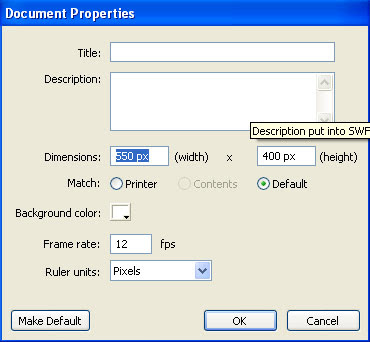
First of all, you need to make sure that ruler Units is set to pixels. This is the standard unit of measurement in multimedia and web pages. It’s important to set Ruler Units to Pixels because this affects several other dialog boxes (including the Info panel). Next to Background Color, you should see a white swatch that, when clicked, allows you to change the stage color. This isn’t actually as useful as you might think because at the time you publish a movie to the web, you can specify any background color you want, and it will override this setting. Feel free to change Background color any time you want. Maybe gray will be easier on your eyes, or black will make selecting white graphics easier. I often use a bright red background just so it’s super clear while I’m editing. Do whatever you want-not only can you change this setting later, but it also affects only the stage color while you’re editing.
Two other Document properties dialog box settings are important to establish early in any project: Frame Rate and Dimensions. Frame Rate specifies the rate-that is, how many frames per second-at which Flash attempts to play. Is say attempts because some of your users might not have a computer fast enough to keep up, so Flash just can’t display the specified number of frames in a second. Flash will not exceed the frame rate you specify, but it can get bogged down and not keep up. Dimensions are important only to the degree that they affect the aspect ratio of your stage, as discussed earlier. You need to decide up front on the shape for your stage (sorry, it can’t be round). Do you want a wide-screen cinemascope look, or do you want a square stage? You might even want a vertical rectangle, such as for a button bar to appear on the left side of a web page. You need to consider this early on because the stage shape influences how you position graphics, and changing it later makes for a lot of repositioning.
People often confuse frame rate with speed, which is more of a visual effect. Animators can use tricks to make something appear to speed across the screen even while using a very low frame rate. For example, if you see a picture of a car on the left side of the screen and then a fraction of a second later, it’s on the right side of the screen that may tell your brain that the car is moving fast. However, such a trick requires only two frames-and at a frame rate of 4 fps, the second frame appears only a quarter second after the first! Frame rate-that is, how many chunks into which each second is broken-controls the visual resolution. Four frames a second may look “chunky”-each change occurs only four times a second. However, 30 fps (equivalent to the frame rate of TV) is such a fine increment that you’re not likely to see the steps between discrete frames (although, of course, that’s what’s really happening). By the way, you can still move a car across the screen in a quarter of a second by using 60 fps-it would just involve 15 frames. You’ll explore this topic in great detail in Next Postings.
Tuesday, November 24, 2009
New Layer Commands
The new Layer via Cut (Command/Ctrl+Shift+J)and the New Layer via Copy (Command/Ctrl+J) commands are essential options when creating layers. Use these commands to either cut or copy selected pixels to a new layer.
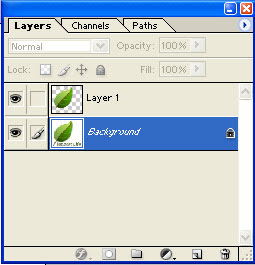
1. Start by making a selection. Then chose layer > New > Layer via Copy to create a new layer containing a copy of the selected pixels. The new layer is automatically named Layer 1, etc., depending on the number of layers already in the document. The new layer is created above the layer that is active when you choose the layer via Copy command

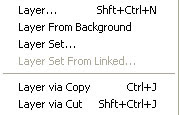
2. Make a selection, then choose New Layer via Cut to cut the selected pixels to a new layer. Notice when you reposition the pixels on the new layer, the area on the Background layer from which they were cut is filled with the current background color.
Monday, November 23, 2009
Transforming Layers
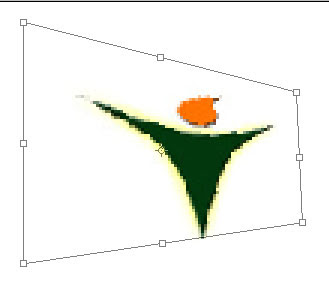
Once you have moved pixels to a new layer you can then transform the layer. Using Free Transform you can scale, rotate, distort, skew and create perspective effects.
1. Ensure the layer is active. Choose Edit > Free Transform. A bounding box with handles appears around the pixels. To scale a layer, drag a handle. To scale in proportion, hold down Shift then drag a corner handle.
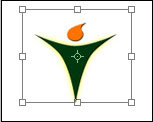
2. To rotate a layer, position your cursor slightly outside the bounding box. The cursor changes to a bi-directional arrow. Drag in a circular direction. You can drag the Point of Origin marker to a new position to specify the point around which the rotation takes place.
3. To skew the layer, hold down Command/Ctrl + Shift, then drag the centre top/bottom, or the centre left/right handle.
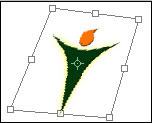
4. To create perspective, hold down Command/Ctrl + Alt + Shift then drag a corner handle. To distort the layer, hold down Command/Ctrl then drag a corner handle. This allows you to move corner handles independently.
5. To accept the transformation bounding box, press Return/Enter, or double-click inside the bounding box. To revert to the original state without making changes, press the Esc key.
1. Ensure the layer is active. Choose Edit > Free Transform. A bounding box with handles appears around the pixels. To scale a layer, drag a handle. To scale in proportion, hold down Shift then drag a corner handle.

2. To rotate a layer, position your cursor slightly outside the bounding box. The cursor changes to a bi-directional arrow. Drag in a circular direction. You can drag the Point of Origin marker to a new position to specify the point around which the rotation takes place.
3. To skew the layer, hold down Command/Ctrl + Shift, then drag the centre top/bottom, or the centre left/right handle.

4. To create perspective, hold down Command/Ctrl + Alt + Shift then drag a corner handle. To distort the layer, hold down Command/Ctrl then drag a corner handle. This allows you to move corner handles independently.

5. To accept the transformation bounding box, press Return/Enter, or double-click inside the bounding box. To revert to the original state without making changes, press the Esc key.
Adobe Flash Properties Panel
This day looks at the multipurpose. Properties panel (also sometimes called the properties inspector, or PI for short-though I’ll call it the Properties Panel throughout this Blog).
All panels let you view and change properties of objects. Although you can find nearly two dozen panels listed in the window menu, you will use one panel almost all the time- the properties panel. The properties panel displays properties of the currently selected object so that you can make adjustments. For example, when you select a block of text, the Properties panel lets you view and change the font face and size. When you select a filled shape, you can adjust the fill color of that shape. In addition to modifying objects onstage, the Properties panel lets you modify frames in the Timeline (when you select one) as well as document properties (when nothing is selected). Although you’ll look at only a few variations of the Properties panel this day. You’ll eventually become familiar with all the different panels. (You can see them all listed under the window menu.) Because there are so many panels, later this day you’ll learn ways to organize them to suit your personal workflow.
As you’ll see, using panels is simple. All panels operate in the same manner. You can either keep the panel open and select an object or access the panel after you’ve selected an object. In either case, the panel always reflects the current settings so that you may modify or change them. For example, to change the font size of some text, you just select the text selected while you access the Properties panel. You can also change properties of several objects at once – just select multiple objects (say several blocks of text) and make a change in the panel. (When selecting multiple objects of different types, only the shared properties are visible in the properties panel.). You’ll learn more about all this in the following tasks.
Finally, if nothing is selected, you can still make changes to the Properties panel (or any panel for that matter). Although this may seem to have no effect. You’re actually specifying what will happen the next time you create an object. For example, if you first select the text tool and (before clicking onstage) you make a change to the font in the Properties panel, you’ll see that font change in text you create later.
Use the Properties Panel to Inspect and Change Fill Colors
In this task, you’ll use the properties panel to inspect and change fill colors. Here are the steps to follow:
1.Create a now file by selecting File, New to open the New dialog box, and then selecting Flash File (Action Script 3.0) and clicking ok. Make sure that the properties panel is open. Its default location is below the stage. If you don’t see it, just select window, properties, properties. Finally, ensure that the properties panel is at full size by clicking the tiny double arrows to the left of the tab labeled properties (as shown in Figure 1.10). The properties panel actually has three states: full, mid-size, and mini(fully collapsed). Keep clicking that double-arrow button until the panel is full sized.

2.Click the stage and then take a look at the properties panel to notice the type of information listed (Size, publish, Background, and so on). The properties panel is about to change.
3.Select the Brush tool by clli8cking once in the Tools pane; if the Tools panel is not available, you need to first select it from the Window menu. Notice that when you simply select the Brush tool, the Properties panel changes. Go ahead and paint a squiggly line on the Stage.
4.Before you draw again, select a different color from the Fill Color swatch in the properties pane. Click the swatch and select a different color (as shown in Figure 1.11). This specifies what color you’re about to paint.
5.Paint another squiggly line (in the now color) on a blank area of the Stage. Select the Selection tool by clicking the black arrow at the top left of the tools panel or by simply pressing the V key.
6.Click once on the first squiggly line to select it. Notice that the Properties panel changes again. Additional information about the shape’s coordinates and size appear. While the shape is still selected, change the fill color by clicking the Fill color swatch in the properties panel and picking a new color. (By the way, the swatch with a red line through it-stroke color-is for shapes drawn with the pencil tool.)
7.Finally, make both squiggly shapes the same color. Make sure that you still have one shape selected and then click and release on the Fill Color swatch. Then (while the cursor looks like an eye-dropper) click the other squiggly shape to sample its color. This is just a quick example of how the cursor changes to tell you what happen when you click. The properties panel adapts to show you properties either of whatever you’ve selected on the stage or for the tool you’ve just selected. The following sections explore some text options to solidify this concept.
You can click the double arrows so that the Properties panel opens all the way, as shown here
Sunday, November 22, 2009
Managing Layer Styles
Once you have created a layer effect you can continue to edit the effect and you can use a variety of commands from the Layer Effects sub-menu to manage the effects.
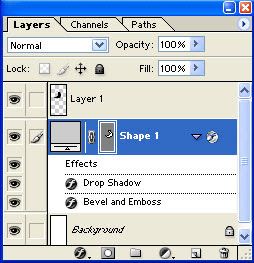
1. To edit the settings used to create a layer effect, make sure the appropriate layer is active, then click the Expand triangle to display layer effects as separate entries in the Layers palette. Double-click the ‘f’ icon next to the name of the effect. You can continue to adjust settings as long as the layer displays the Layer Effects icon.
2. To temporarily disable layer effects on all layers, not just the active layer, choose Layer > Layer Style > Hide All Effects. Repeat the process to show all Layer effects.
3. To keep the angle of the light source constant if you are using layer effects on more than one layer in an image, choose Layer > Layer Style > Global Light. Enter a value for the Angle in the Global Angle entry box. OK the dialogue box. Make sure you select the Use Global Light option when you create multiple layer effects in the Layer Style dialogue box.
4. To copy exact layer effect settings from one layer to another, first select a layer with a layer effect applied to it, then choose Copy Layer Style from the Layer Style sub menu. Click on another layer in the Layer palette. Choose Paste Layer Style from the Layer Style sub-menu.
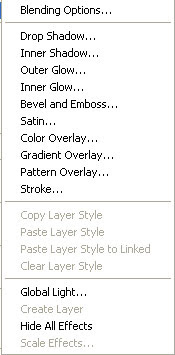
5. To permanently remove layer styles from a layer, make sure you select the appropriate layer, then choose Layer > Layer Style > Clear Layer Styles.
6. Layer styles automate procedures that in the past you had to perform yourself. Use the Create Layer command from the Layer Styles sub-menu to separate the layer effect into the multiple layers that Photoshop has used to create the effect. This can be useful if you need to edit specific parts of the effect.
1. To edit the settings used to create a layer effect, make sure the appropriate layer is active, then click the Expand triangle to display layer effects as separate entries in the Layers palette. Double-click the ‘f’ icon next to the name of the effect. You can continue to adjust settings as long as the layer displays the Layer Effects icon.

2. To temporarily disable layer effects on all layers, not just the active layer, choose Layer > Layer Style > Hide All Effects. Repeat the process to show all Layer effects.
3. To keep the angle of the light source constant if you are using layer effects on more than one layer in an image, choose Layer > Layer Style > Global Light. Enter a value for the Angle in the Global Angle entry box. OK the dialogue box. Make sure you select the Use Global Light option when you create multiple layer effects in the Layer Style dialogue box.

4. To copy exact layer effect settings from one layer to another, first select a layer with a layer effect applied to it, then choose Copy Layer Style from the Layer Style sub menu. Click on another layer in the Layer palette. Choose Paste Layer Style from the Layer Style sub-menu.

5. To permanently remove layer styles from a layer, make sure you select the appropriate layer, then choose Layer > Layer Style > Clear Layer Styles.
6. Layer styles automate procedures that in the past you had to perform yourself. Use the Create Layer command from the Layer Styles sub-menu to separate the layer effect into the multiple layers that Photoshop has used to create the effect. This can be useful if you need to edit specific parts of the effect.

Saturday, November 21, 2009
Flash Timeline
The timeline contains the sequence of individual images that make up an animation. When the user watches uour animation, he sees the images on frame 1 followed by Frame 2, and so on. It’s as if you took the actual film from a conventional movie and laid it horizontally across the screnn, with the beginning on the left and the end toward the right.
Like many other windows, the timeline can be undocked so that it floats above everything else, as shown this fig..

Though, unlike most panels that you drag by their title bar, you need to drag the Timeline from its “gripper” to undock it. Dockig is just one more way to organize your workspace. Personally, I like the default arrangement, with the timeline above the stage and the tools panel to the left.
When you start to create animations, the Timeline includes many visual clues to help you. For example, you can quickly see the length of an animation simply by looking at the Timeline. Also, Flash uses a few subtle icons and color codes in the Timeline; this way, you can see how the animation will play.
In addition to frames, the Timeline lets you have as many layers as you want in animations. As is the case with other drawing programs, objects drawn in one layer appear above or below objects in other layers. Each layer can contain a separate animation. This way, multiple animations can occur at the same time. By using layer names and special effects (such as masking), you can create complex animations.
Friday, November 20, 2009
Flash Tools Panel
The Tools panel is the panel with which you will likely become most familiar. Any time you create or edit anything on the stage, you need to have one tool selected from the tools panel. The default location is docked to the left side of the flash interface.
Although the tools panel is used primarily to draw on the stage, it’s also used to edit what you’ve already drawn. In this fig. the tools panel is actually divided into several sections. The first four are selection tools, then six creation tools, four modifying tools, two view tools, four settings for color, followed by a variety of options that vary depending on which tool is actively selected.

The tools section enables you to create graphics and text (via the line tool and the text tool), to edit graphics (via the Eraser tool and the Paint Bucket tool), and to simply select graphics (via the selection tool, the Subselecttool, and the Lasso tool). You’ll learn about all these tools next posting. The two view tools (Hand tool and Zoom tool) let you change your view of the stage (as you did in the preceding task). The colors give you control over the color of objects drawn. Finally, the options area includes additional modifiers for certain tools. Depending on what tool is selected, you might not see anything in the options section.
You’ll look at these tools in detail in the next coming postings. For now, go ahead and play with these tools. If you think you lost the Tools Panel, you can restore it by selecting Window, Tools.
Wednesday, November 18, 2009
Flash Document
The large white rectangle in the center of Flash’s workspace is called the stage. Text, graphics, photos-anything the user sees-goes on the Stage see this fig.

Think of the stage as the canvas on which a painter of the frame in which a photographer composes pictures. Sometimes you’ll want a graphic to begin outside the stage and then animate onto the stage. Off the stage is the gray area around the outside of the white area. You can see the “off Stage” area only when the view menu shows a check mark next to pasteboard. The default setting (Pasteboard checked) is preferable because it means that you can position graphics off the stage. Realize, however, that any changes you make to the view menu affect only what you see. Changes here have no effect on what the user sees.
There’s not too much to learn about the stage – it’s simply your visual workspace. However, two important concepts are worth covering now: stage size and Zoom level. By default, the stage is a rectangle that is 550pix wide by 400pix tall. In the “document Properties” section, you’ll see how to change the width and height of a movie. However, the specific dimensions in pixels are less important than the resulting shape of the stage (called the aspect ratio). The pixel numbers are unimportant because when you deliver a Flash movie to the web, you can specify that flash scale to any pixel dimension.
Aspect ratio is the ratio of width to height. Any square or rectangular viewing area has an aspect ratio. For example, television has a 4:3 aspect ratio-that is, no matter how big a standard TV screen is, it’s always four units wide and three units tall. 35mm film has an aspect ratio of3:2 (such as a 4*6-inch print), and high-definition television (HDTV) uses a 16:9 ratio as do many widescreen laptops, most computer screen resolutions have an aspect ratio of 4:3 (640*480, 800*600, and 1024*768). You can use any ratio you want in a web page; just remember that the portion of the screen you don’t use will be left blank. A ‘wide-screen’ ratio (as wide as 3:1, like film) has a much different aesthetic effect than something with a square ratio (1:1).
To scale means to resize as necessary. A flash movie retains its aspect ratio when it scales, instead of getting distorted. For examples, you could specify that a flash movie in a web page scale to 100% of the user’s browser window size. You could also scale a movie with the dimensions 100*100 to 400*400.
Not only can you deliver a flash movie in any size (because Flash scales well), but while working in flash. You can zoom in on certain portions of the stage to take a closer look without having any effect on the actual stage size. The following task introduces a couple of tools that are important to the stage.
Monday, November 16, 2009
Layer Styles
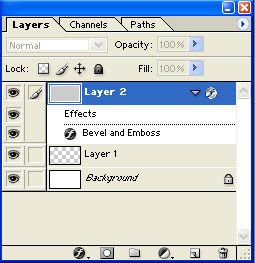
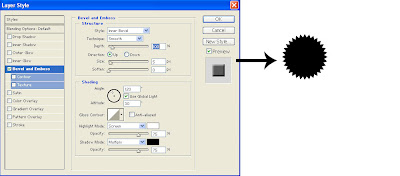
Using the Layer Styles sub-menu, you can create sophisticated layer effects such as soft shadows, beveled and embossed edges, and inner and outer glows quickly and easily. This example consists of 3 layers – a White Background Layer , a coloured circle Shape layer and a coloured triangle Shape layer, and uses Bevel and Emboss options to demonstrate the principles for creating a layer style.
1. To apply a layer style, click on a layer in the Layers palette to make it active. Choose Layer > Layer Style > Bevel & Emboss. In the layer style dialogue box, make sure the Preview option is selected to see the effect applied in the image.
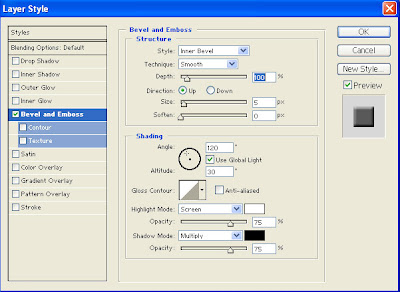
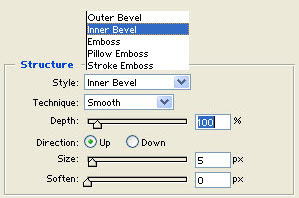
2. In the Structure section for Bevel and Emboss, choose a style from the Style pop-up menu and a technique from the Technique pop-up menu. Select the Up/Down radio button to light the effect from above or below.
3. Use the Depth entry box or slider to adjust the height of the effect. Use the Size slider to control the spread of the bevel. The Soften slider controls the overall intensity of the effect and helps reduce irregularities or artifacts in the effect, crating a smoother result.
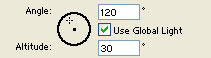
4. In the Shading area, enter a value in the Angle entry box to control the direction of the light source. Enter a value in the Altitude entry box to define the apparent depth of the light source. Use the Angle/Altitude disk to create settings manually if you prefer.
5. Gloss Contour allows you to change the transition of the effect across the affected pixels on the layer.
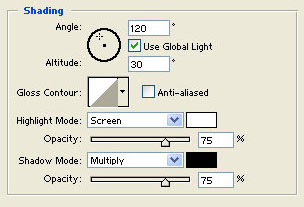
6. Adjust settings for the Highlight and Shadow edges of the effect. It is a good idea initially to leave the blending modes set to Screen and Multiply respectively. Experiment with the Opacity sliders to create a more subtle effect.
7. Ok the dialogue when you are satisfied with the results. Notice in the Layers palette a ‘f’ symbol ( ) on the layer, indicating that there is a layer effect applied to the layer. Whilst the ‘f’ symbol appears the layer effect remains editable.
1. To apply a layer style, click on a layer in the Layers palette to make it active. Choose Layer > Layer Style > Bevel & Emboss. In the layer style dialogue box, make sure the Preview option is selected to see the effect applied in the image.

2. In the Structure section for Bevel and Emboss, choose a style from the Style pop-up menu and a technique from the Technique pop-up menu. Select the Up/Down radio button to light the effect from above or below.

3. Use the Depth entry box or slider to adjust the height of the effect. Use the Size slider to control the spread of the bevel. The Soften slider controls the overall intensity of the effect and helps reduce irregularities or artifacts in the effect, crating a smoother result.
4. In the Shading area, enter a value in the Angle entry box to control the direction of the light source. Enter a value in the Altitude entry box to define the apparent depth of the light source. Use the Angle/Altitude disk to create settings manually if you prefer.
5. Gloss Contour allows you to change the transition of the effect across the affected pixels on the layer.

6. Adjust settings for the Highlight and Shadow edges of the effect. It is a good idea initially to leave the blending modes set to Screen and Multiply respectively. Experiment with the Opacity sliders to create a more subtle effect.
7. Ok the dialogue when you are satisfied with the results. Notice in the Layers palette a ‘f’ symbol ( ) on the layer, indicating that there is a layer effect applied to the layer. Whilst the ‘f’ symbol appears the layer effect remains editable.

Sunday, November 15, 2009
Flash introduction
The Flash environment is deceptively simple. With it, you can get started drawing and animating right away. However, Flash might not act the way you expect it to.
To make sure you get off on the right foot, it pays to first cover some basics. Although Flash is consistent with other types of software in several ways, there are many more ways in which Flash is different. Experienced users and novices like should understand the basics covered this hour.
Panels are special tools in Flash that give you access to see and change almost any setting while editing a file. The properties panel enables you to change the font style and size.
Friday, November 13, 2009
Layer Sets
When you create complex images with multiple layers it is convenient to simplify the layers palette by grouping related layers together into a layer set. Creating layer sets in complex, multilayered images makes it much easier to manage the elements in the image.
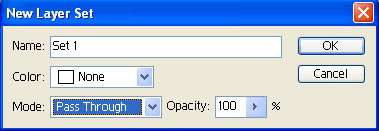
1. To create a new layer set, click the New Layer Set button in the bottom of the Layers palette to use the current default settings, or choose New Layer Set from the pop-up menu in the palette.
2. To create a layer set from existing layers, first link the layers you want to combine into a layer set. Choose New Set From Linked in the palette pop-up menu, or choose Layer > New > Layer Set from Linked.
3. To move a layer into a layer set, drag a layer onto the Layer Set folder. Release the mouse when the Layer Set folder highlights. The Layer is positioned at the bottom of the layers already in the layer set. If the layer set is expanded, drag the layer to the desired position. Release when the highlight bar is in the correct position.
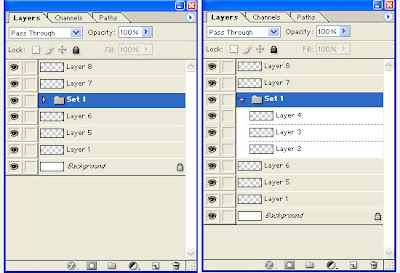
4. Click the Collapse/Expand triangle to reveal or hide the layers contained within the layer set.
1. To create a new layer set, click the New Layer Set button in the bottom of the Layers palette to use the current default settings, or choose New Layer Set from the pop-up menu in the palette.

2. To create a layer set from existing layers, first link the layers you want to combine into a layer set. Choose New Set From Linked in the palette pop-up menu, or choose Layer > New > Layer Set from Linked.
3. To move a layer into a layer set, drag a layer onto the Layer Set folder. Release the mouse when the Layer Set folder highlights. The Layer is positioned at the bottom of the layers already in the layer set. If the layer set is expanded, drag the layer to the desired position. Release when the highlight bar is in the correct position.

4. Click the Collapse/Expand triangle to reveal or hide the layers contained within the layer set.
Monday, November 9, 2009
Locking Layers
There are four levels of lock that can be applied to Layers. A dimmed lock icon appears to the right of the layer when you select one of the lock options. A solid lock icon appears when the layer is fully locked.
1. To completely lock a layer, select the layer in the Layers palette, then click the Full Lock option. You will not be able to reposition the layer or make any changes to it, including changing blending mode, opacity and layer style.

2. To prevent the layer from being moved using the Movie Tool, click the Position Lock Option.

3. To disable painting tools on the layer, select the Paint Image Pixels Lock option. You can still edit any mask applied to the layer. You cannot move the layer.
Selecting the image Lock option automatically locks transparency for the layer.

4. Click the Transparency Lock to preserve transparent areas of a layer. You can make changes to the existing pixels on the layer, but you cannot make changes to any areas of transparency. For example, if the Transparency Lock is selected, the blur filters do not work on the layers as blurred pixels cannot be spread into the areas of transparency.

Subscribe to:
Posts (Atom)