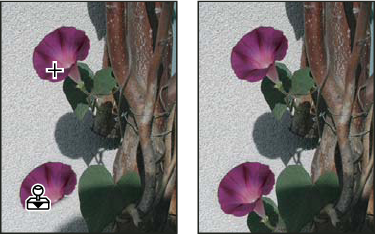
To use the Clone Stamp tool, you set a sampling point on the area you want to copy (clone) the pixels from and paint over another area. To paint with the most current sampling point whenever you stop and resume painting, select the Aligned option. Deselect the Aligned option to paint starting from the initial sampling point no matter how many times you stop and resume painting.
You can use any brush tip with the Clone Stamp tool, which gives you precise control over the size of the clone area. You can also use opacity and flow settings to control how paint will be applied to the cloned area.

1. Select the Clone Stamp tool .
2. Choose a brush tip and set brush options for the blending mode, opacity, and flow in the options bar.
3. To specify how you want to align the sampled pixels and how to sample data from the layers in your document, set any of the following in the options bar:
Aligned Samples pixels continuously, without losing the current sampling point, even if you release the mouse button. Deselect Aligned to continue to use the sampled pixels from the initial sampling point each time you stop and resume painting.
Sample Samples data from the layers you specify. To sample from the active layer and visible layers below it, choose Current And Below. To sample only from the active layer, choose Current Layer. To sample from all visible layers, choose All Layers. To sample from all visible layers except adjustment layers, choose All Layers and click the Ignore Adjustment Layers icon to the right of the Sample pop‑up menu.
4. Set the sampling point by positioning the pointer in any open image and Alt-clicking (Windows) or Option-clicking (Mac OS).
5. (Optional) In the Clone Source panel, click a clone source button and set an additional sampling point.
You can set up to five different sampling sources. The Clone Source panel saves the sampled sources until you close the document.
6. (Optional) Do any of the following in the Clone Source panel:
To scale or rotate the source that you’re cloning, enter a value for W (width), H (height), or the rotation in degrees .
To reverse the direction of the source (good for mirroring features like eyes), click the Flip Horizontal or Flip Vertical buttons.
To show an overlay of the source that you’re cloning, select Show Overlay and specify the overlay options.
Note: Select Clipped to clip the overlay to the brush size.
7. Drag over the area of the image you want to correct.

No comments:
Post a Comment