 THE OLD DOG STILL HAS NEW TRICKS
Not many programs make it to 20 years of age—Photoshop is one of the few. The feature list of such a mature program (version 12) has to either get shorter but more extraordinary or branch into new areas—and Photoshop keeps doing both. There are a number of new features in this version making it worthwhile: Edge Detection, Content-Aware Fill, Puppet Warp, 64-bit for Macintosh, enhanced 3D features (Extended only), painting and brush enhancements, enhanced HDR, auto Lens Correction, Mini Bridge, and numerous other small enhancements. Everyone is going to have a different opinion as to which features are the most important. My list isn’t necessarily in any particular order, but here it is….
Edge Detection: The Extract filter was left out of CS4, although it was available as a separate install. (Rumor has it that the new Edge Detection feature wasn’t ready for CS4 and was pushed back to CS5.) While the Extract filter got a lot of bad press, it was really due to misuse. Luckily, Photoshop CS5 does a better job than the filter. Selection of complex edges, such as curly hair, has always been a problem. The Edge Detection setting is now part of the Refine Edge and Refine Mask dialogs. The feature is fairly easy to use: make a selection or a layer mask, open the Refine Edge dialog (Select>Refine Edge), and use the Refine Radius tool (E) to brush over the desired area. (There’s an Erase Refinements tool [just press Shift-E] in case you don’t like the results and want to try again.) In addition, there’s a Smart Radius checkbox with a Radius adjustment slider to make selections even easier. This tool makes short work of some tough selections, but it’s not for every image. I found it worked great on some images, but not others. You still might want to bone up on using the image calculations for advanced selections.
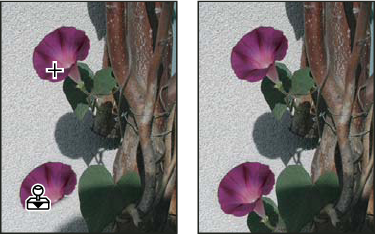
Content-Aware Fill: This feature tends to get the “oohs” and “aahs” from the audience! Content-Aware Fill is available when deleting from a Background layer, when using the Fill command (Edit>Fill) for other layers, or with the Spot Healing Brush (by turning it on in the Options Bar). This feature copies areas around the object being deleted, creating background fill where there was none. Depending on the background, the results can be amazing, but just like Edge Detection, it doesn’t work on every image. Most demonstrations tend to show the feature at its best. Images with abstract components work best, but one must be careful of repeating elements (which the eye can detect easily). Luckily, the problem areas can be reselected and reprocessed until the desired results are obtained.
Puppet Warp command: If you’re familiar with the After Effects Puppet tool, you’ll feel right at home with the new Photoshop Puppet Warp feature. Puppet Warp, available via the Edit menu, lets you alter the image by putting a triangular grid over the layer’s pixel area. You can then use the Puppet Warp tool (automatically selected when using the Puppet Warp feature) to place pivot points. The image can be gently manipulated along the pivot points—sort of like Liquify, but with more control. There are options to make the grid larger or smaller, to make the movements grander or more precise, and the movements less or more rigid. For most images, you’ll want to isolate the object on its own layer, and then keep the edits simple—you won’t make someone look like they’re doing jumping jacks and keep it realistic.
64-bit: Windows had it in CS4, now Mac has it in CS5. Photoshop CS3 for Windows and Photoshop CS4 for Macintosh were 32-bit programs. That meant that the maximum RAM the program could address was 4 GB. With 64-bit software, the RAM limit is more than 18 billion GB. Of course, current hardware can’t hold that much RAM, but let’s just say the 64-bit software should suffice for some time. To run 64-bit software, one needs a 64-bit operating system, which means Windows Vista 64-bit, Windows 7 64-bit, Mac OS X Leopard, or Mac OS X Snow Leopard.
As far as improved performance goes, you’ll notice it in some areas more than others—especially in the blurs and some of the new features, including Content-Aware Fill and Lens Correction.
Enhanced 3D: The 3D features keep getting more useful to the everyday designer and easier to use. A couple of new features include Repoussé, which extrudes flat selections into 3D objects, similar to the 3D extrude in Illustrator but more complex. It will take a little practice to get all the settings under control, but the presets make it fun to play with. The 3D meshes can be textured with any number of built-in textures or with new ones downloaded from the Photoshop Marketplace (3D>Browse 3D Content Online).
3D objects can be set to generate shadows in 3D space with the Ground Plane Shadow Catcher function. This function only works when the render quality is set to one of the Ray Traced settings, which requires a good video card for reasonable performance.
Although the 3D effects are faster than ever, when I played with the new Repoussé settings and the Shadow Catcher on my MacBook Pro 3.06 GHz with 8 GB RAM, I still was waiting a bit for the results to show up onscreen—not to mention causing the fans to kick in from all that heavy processing. If you’re working with these settings on an older computer, expect some delays.
Painting and Brush enhancements: Photoshop creeps closer to the feature set of Corel Painter, especially with this version’s new Mixer Brush and Bristle Tip brushes. The Mixer Brush allows you to pick up a color from the image or the foreground color and mix it with the image’s underlying colors. At first, it might appear as simply a variation on the Blur or Smudge tools, but a quick look at the Options Bar shows many other settings. The ability to control how Wet the brush is, the Load (how much paint is on the brush), and Mix (the amount of mix from the brush to the canvas) allow you to create some interesting blends of colors in an image.
The Bristle Tip brushes give you even more ability to create natural media paint effects. The Brushes panel includes a new section for creating custom Bristle Tip brush presets. If you combine the new brush tips with a tablet, you can see the brush rotate based on the tablet’s pen position in the Bristle Brush preview. I used an older Intuos2 XD model and it worked fine. You do, however, need an OpenGL video card to see the Bristle Brush preview.
As mentioned, these features inch Photoshop a little closer to Corel Painter, but it has a long way to go to replace it. It will be interesting to see if Photoshop keeps getting more Painter-like features in future releases.
Enhanced HDR: While not as powerful as third-party HDR programs, the Photoshop HDR features continue to improve. The adjustment controls are greatly enhanced, giving more options than previous versions. Another nice feature is the Remove Ghosts setting that removes parts of the image that moved slightly when capturing the images. Another interesting feature is the HDR Toning option under the Image>Adjustments menu. This setting doesn’t require multiple exposures as true HDR does, but can mimic the HDR results.
Auto Lens Correction: The Lens Correction filter can fix typical lens errors, namely barrel and pincushion distortion, vignetting, and chromatic aberrations. The nice thing about this feature is the Auto Correction, which can do most, if not all, of the work for you. Custom lens settings can be saved with the free, downloadable Adobe Lens Profile Creator from http://labs.adobe.com. Don’t expect miracles here—fixing the major distortion of an image will usually distort other parts of the image. There’s a little adjustment that can be made to the correction, but when fixing barrel and pincushion distortion, something has to give.
Bridge and Mini Bridge: Bridge has its own enhancements, but Photoshop users will want to make note of Mini Bridge. It’s sort of like the old Browser window from pre-Bridge versions. Mini Bridge is just like the name implies—a panel version of Bridge running directly in Photoshop. Bridge must be running for Mini Bridge to work (it will open Bridge if it’s not currently running).
Small things: Adobe does actually pay attention to the feature requests it gets (so fill them out!). There are a number of small updates, but here are some of the better ones: the ability to adjust the opacity of multiple layers at once; a Straighten button when using the Ruler tool; a grid feature when cropping (including the Rule of Thirds grid); and the ability to set defaults for layer styles.
The OpenGL brush resize options, introduced in CS4, has had a minor change: Control-Option-click (PC: Alt-Right-click) now changes both the brush size and hardness at the same time by dragging left-to-right and top-to-bottom, respectively.
Another thing that might throw off longtime users is the change of the Zoom tool and Command-Spacebar behavior (PC: Ctrl-Spacebar)—instead of allowing a click-and-drag to zoom into the area you dragged around, it auto-zooms with a left-to-right drag. Luckily, you can turn off Scrubby Zoom in the Options Bar of the Zoom tool to resolve the changed behavior. Camera Raw has been updated to version 6 with new camera support and better noise reduction.
Due to Adobe’s new upgrade policy (started with CS4) if you have Photoshop CS(1) or earlier, you have to purchase the program new—there’s no upgrade option. However, there’s definitely enough here to recommend an upgrade—especially if coming from CS3 or CS2.—David Creamer
Company: Adobe Systems Incorporated
Price: $699 (Upgrade: $199); Extended: $999 (Upgrade: $349)
Web:
www.adobe.comVia:
layersmagazine


